Return to Hints and tips complete index
Menu: Page>Insert page, and in the resulting dialogue window set Insert 1 pages after page 1 [OK]
It doesn't insert the page, the document still has the same number of pages, and no blank page after the end of page 1. Why?
The insertion of extra pages causes a lot of head scratching. The behaviour depends very much on how the document is set up and how you go about inserting the new page. Generally, an Ovation Pro document is most likely to have a page master frame that is autolinked to flow text from one page to the next. The other usual settings (in document preferences) is for Auto page insert and Auto page delete to be set on. This means the document behaves as a 'normal' word processed document, i.e. new pages are automatically created as new content is added, the text flows through the document from page to page, and if content is reduced, blank pages at the end of the document are automatically deleted. This is exactly the behaviour you see when manually inserting new pages. So what is Ovation Pro doing?
Master frames auto-linked
| Let us take a simple example, a document containing just two pages, shown in figure 1 (right). It has been set up with the settings Auto page insert and Auto page delete both on, and with the master frame set to give autoflow. The 'contents' of the pages are labelled A and B. | 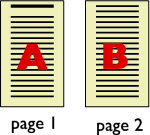 |
| If we were to continue to add text to the end of the second page, then a third page would be auto-generated when the page was full and the text would flow into it (figure 2 right). | 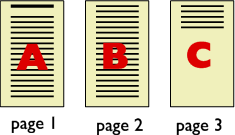 |
The easiest and simplest method
When you have a document with exclusively text in master frames, and you decide you want to add text between pages 1 and 2, the simplest way is to insert the caret at the top of page 2 and just start typing. You do not need to use any menu choice or key short cuts to insert a New Page to do this, the following text will overflow into a new page 3 which will be created automatically. This is very similar to what is shown above.
Embedded frames - The description in the preceding paragraph is valid not only for pure text but also for text with embedded graphics, since embedded frames are always flowed as part of the text. This also applies to the following discussion, although it is not explicitly stated, i.e. embedded frames can always be considered as part of the text that contains them.
However, lets suppose we have a reason to add content between page 1 and page 2 by inserting a new page.
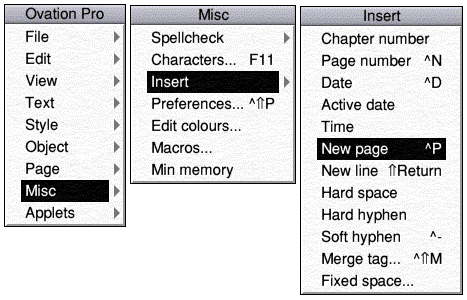
Method 1 - using the Page->Insert page... dialogue
We raise the Menu Page->Insert page... dialogue. We have two equivalent choices - either insert a page after page 1 or insert a page before page 2 (figure 3).
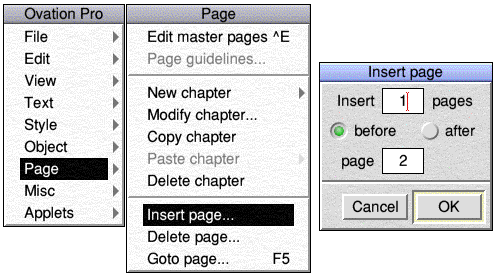
Figure 3 - the insert page dialogue
1. Document contains only text in the master frames
When we go through this procedure the document finishes up unchanged. To explain this we need to consider what Ovation Pro has actually done.
| The new page is initially inserted where we want it after the auto linked chain is broken. If the process could be interrupted at this point we would see the three page document shown to the right, which is what was required. | 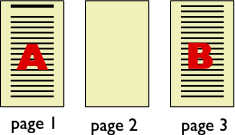 |
| This is not the end of the process. The auto-linking between the frames is now reinstated and the complete document reflowed. Any text on page 3 (originally page 2) will be moved back in to the new empty page 2 (see right). | 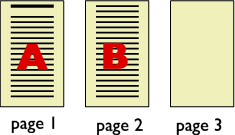 |
|
Since page 3 is now empty, and we have the Auto delete pages set, the last page is now deleted. We are back to where we started, and nothing appears to have happened. Auto delete pages and Auto insert pages are set in the document General Preferences (Ctrl-Shift-P or Menu: Misc->Preferences...) If the Auto delete pages flag had not been set, we would have remained at the previous stage with an empty page 3 still in the document. |
|
Remember, we cannot actually see these intermediate situations - they have just been presumed to exist to illustrate the way in which the overall process works.
2. Document contains text and local frames in the master frames
| Now let our document contain a local frame (text or graphic) on page 2. The behaviour is now rather different. The figure to the right depicts the starting situation. Remember the graphic is a local frame. | 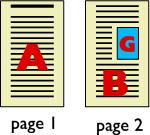 |
| When we go through the Insert page procedure, the initial action would be the same as previously, with the new blank page 2 inserted, and the contents of the original page 2 now on the next page (page 3). | 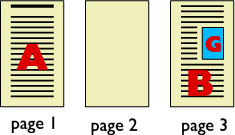 |
| Now, when the text is reflowed, the text will again flow back in to page 2. The local graphic, however, will remain on page 3. The result is shown to the right, and this is the final result we would observe. | 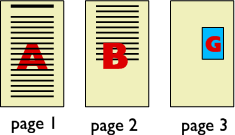 |
Method 2 - using the Misc->Insert->New page menu option
There is an alternative way to insert a new page - using the Misc->Insert->New page menu option.
This method will put a page break at the current position of the caret, so you must set the correct position of the caret before making this choice. There is a keyboard short cut (ctrl-P). The keypad-Enter key may also be used. The behaviour may be different to the previous method.
1. Document contains only text in the master framesThe starting document is depicted above right. Assuming that autoflow and autopage insertion is set for the document, then this will indeed insert a blank page 2 (lower right). The caret should have been placed at the start of the original page 2. New content can now be added to page 2 by simply placing the caret and typing. Note that, if page 1 is subsequently edited, causing text to flow over into the new page 2, then the current contents of page 2 will be forced onto yet another new page. On the other hand, if text is deleted from page 1 then the text from page 3 may be reflowed into page 2. It may be necessary to actually insert two page breaks (one at the end of page 1, and one at the start of page 2) to allow page 1 to be edited. |
|
2. Document contains text and local frames in the master frames
| The behaviour is now the inverse of the previous method. Inserting a page break in this way affects only the auto flowing text, with local frames being unaffected. Thus the result of inserting this type of page break is shown on the right. The text is forced into the new autocreated page 3, but the local frame remains on page 2. | 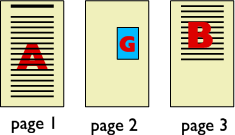 |
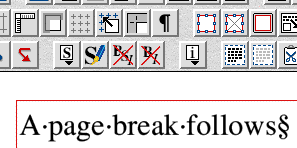
The use of ctrl-P or the equivalent menu option inserts a page break control character, which can be seen if 'Invisibles' is turned on (the button in the button bar containing the ¶ character). The page break character is shown as a § character (see image below). The term 'Insert page' when applied to ctrl-P or the menu equivalent is perhaps a misnomer. It is really a 'move to next frame'. While there is only one master frame on a page, then it does indeed throw a new page. However, if the document is a multi-column layout, then ctrl-P moves to the next linked frame, rather than to the next page. The new page is only created when the caret is on the last frame on the page.
Method 3 - Using local frames
|
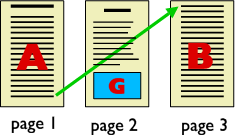
There is another way of 'inserting' a page that may be the preferred method in certain circumstances. If we assume the document has an auto-linked master frame, and auto insert and delete pages are set on, then simply filling page 2 with a local frame will effectively insert a blank page for us. The original content of page 2 will be pushed into the autocreated page 3, and then text and graphical content of the new page 2 can then be created completely independently of the main document. Note that any local frames on the original page 2 will remain there but will be behind the new full page frame. It is important to remember that the main text will now always auto-flow from page 1 to page 3, while the content placed in the local frame on page 2 will not flow into any other pages, unless you manually link the frame with another local frame. The green arrow in the figure emphasises the way the main text will flow. |
|
Master frames NOT auto-linked
In this case things are much simpler. Insert page acts as expected, with all the following content being moved on. However, all pages must be created manually, and if some text is required to flow from one page to another, then the frame links also must be inserted manually.
Thanks to John M van Vredenburch for suggesting a number of improvements to the first draft of this page.
